
🍗 Homestyle Crispy Chicken Tenders That Taste Like Childhood, Only Better 🍞
1. Introduction
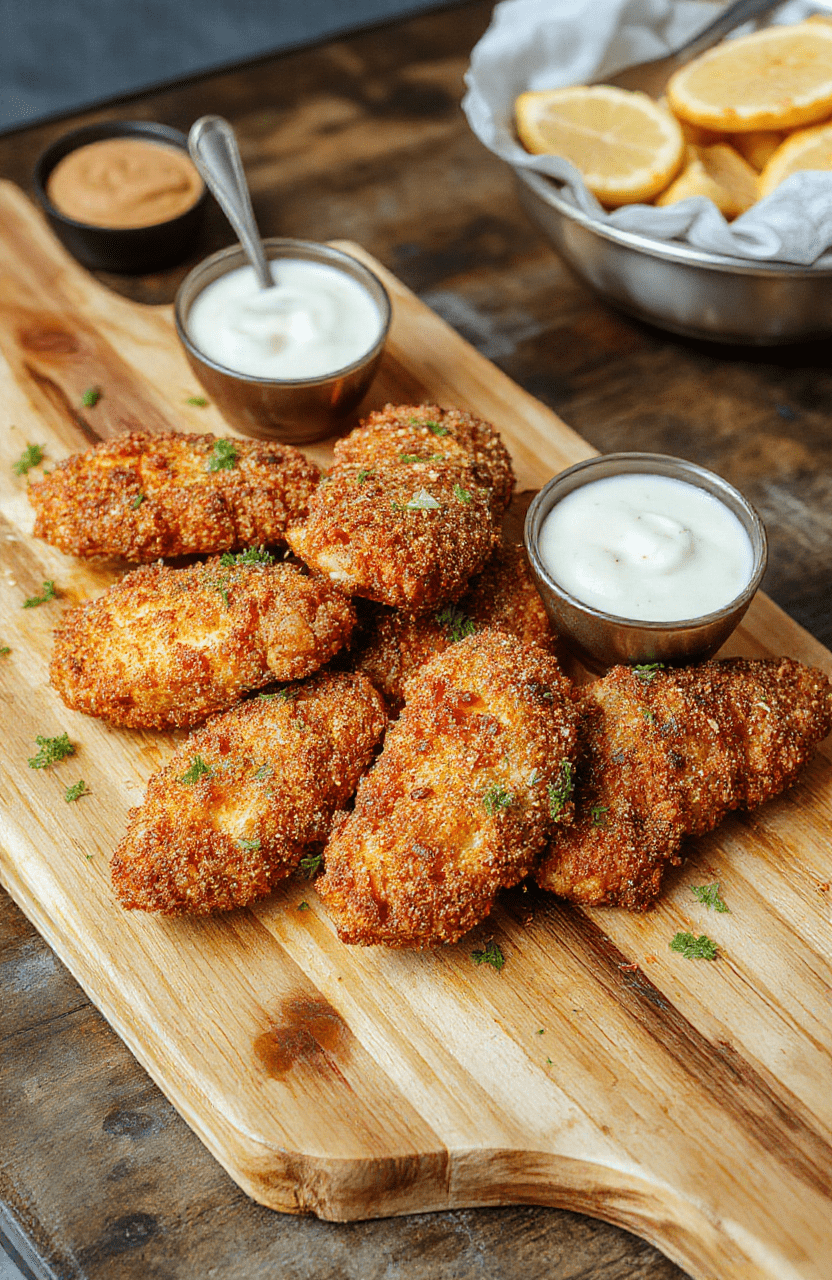
There’s something deeply nostalgic about homestyle crispy chicken tenders — golden-brown, shatteringly crisp on the outside, tender and juicy within, and served with your favorite dipping sauces. These tenders evoke the comfort of home-cooked meals and school lunchdays, but with a twist that makes them uniquely *you* — seasoned to perfection, double-breaded for ultimate crunch, and baked (or air-fried!) for a smarter, mess-free supper. Whether you’re chasing that Chick-fil-A copycat perfection or searching for the easiest baked chicken tenders for busy weeknights, this recipe delivers every single time.
2. Why You’ll Love This Recipe
- Ready in 30 minutes — from prep to plate, faster than takeout.
- One-pan (or air fryer basket) wonder — minimal cleanup, maximum flavor.
- Kid-approved & crowd-pleasing — perfect for game-day snacks or family dinners.
- Customizable heat & herbs — swap spices to match your mood or dietary needs.
- Meal-prep friendly — freeze unbreaded cutlets or fully cooked tenders for quick reheat.
3. Ingredient Notes
Here’s where “homestyle” truly shines — it’s not just about frying. It’s about balance, tradition, and using ingredients that *deliver*. Let’s talk why each matters:
- Chicken tenders (not strips!) — Tenderloins are naturally thin, fast-cooking, and retain moisture better. Look for organic or air-chilled for deeper chicken flavor.
- Parmesan cheese, finely grated — Adds umami depth and helps crisp the crust. Pre-grated works, but fresh grated from a block gives superior texture.
- Seasoned panko breadcrumbs — Lighter and crunchier than regular breadcrumbs. If you’re avoiding gluten, try crushed gluten-free crackers or almond flour (more below in swaps!).
- Dijon mustard — A little tangy depth that holds the coating without overpowering. Yellow mustard works in a pinch, but Dijon adds character.
- Paprika (sweet or smoked) — Not just for color! Smoked paprika adds a subtle campfire vibe that elevates the whole dish.
- Buttermilk soak — This isn’t optional. Buttermilk tenderizes and seasons from the inside out. If you’re out, mix 1 cup milk + 1 tbsp lemon juice, let sit 5 mins.
4. Kitchen Tools You Need
Cooking homestyle crispy chicken tenders is simple — but having the *right* tools makes all the difference between “good” and “unforgettable.” Here’s how to level up your kitchen:
The Ninja Air Fryer Pro Crisp & Roast 4-in-1 delivers that perfect store-bought crunch without the oil — and uses 70% less oil than deep frying. If your kitchen is tight on space, the Compact 6-in-1 Digital Air Fryer by Amazon Basics is a powerhouse for small batches and reheating leftovers. For full holiday spreads or double-batch cooking, the Ninja Foodi Smart XL Indoor Grill & Air Fryer Combo lets you grill *and* air fry simultaneously.
And when it comes to cleanup? A sturdy nonstick set ensures your tenders release cleanly and your pans last longer. The T-fal 14-Piece Hard Anodized Nonstick Cookware Set offers even heat distribution and a durable, scratched-resistant surface — ideal for sautéing aromatics or searing any veggie sides.
5. How to Make Homestyle Crispy Chicken Tenders
Phase 1: Prep & Prep (10 minutes)
Begin by slicing chicken tenders into uniform strips — about 1 inch thick and 4 inches long. Uniform size = even cooking.
In a shallow dish, combine buttermilk, 1 egg (optional but adds richness), 1 tsp salt, ½ tsp black pepper, and 1 tsp garlic powder. Whisk well. Add chicken strips, making sure they’re fully submerged. Cover and refrigerate for at least 15 minutes — even better if you marinate 1–2 hours.
In another dish, mix 1 cup panko breadcrumbs, ¼ cup grated Parmesan, 1 tsp paprika, ½ tsp onion powder, ½ tsp dried thyme, ½ tsp salt, and ¼ tsp cayenne (optional for heat).
Phase 2: The Double-Dip (The Secret to Ultimate Crisp!) (5 minutes)
Heat your oven to 425°F (220°C) and place a wire rack over a baking sheet. Lightly grease the rack with nonstick spray — this prevents steaming and ensures airflow.
Remove one chicken strip from the buttermilk, letting excess drip off. Dip into the crumb mixture, pressing firmly to adhere. Now — and this is the pro move — double-dip: dip back into buttermilk, then again into crumbs. This creates a thick, crackling crust that stays crunchy even after resting.
Place on the rack and repeat with all strips. Let rest 5 minutes before baking — this helps the coating cling.
Phase 3: Bake or Air Fry (12–15 minutes)
Bake option: Bake 10 minutes, flip carefully with tongs, and bake 3–5 more minutes until golden and internal temp hits 165°F.
Air fry option: Air fry at 400°F (200°C) for 8 minutes, flip, and air fry 3–4 more minutes until deeply golden and crisp. For extra crunch, spritz lightly with oil before flipping.
Watch closely — browning should be golden amber, not burnt. You’ll smell nutty, buttery, toasty aromas — that’s your cue they’re near done!
6. Expert Tips for Success
- Don’t skip the rest step — 5 minutes after breading lets the glaze re-hydrate and fuse with the breadcrumbs.
- Cold chicken = crispier result. Chill breaded tenders 10 minutes before cooking if you’re short on time.
- Use a wire rack. Cooking directly on the pan = soggy bottom. Full stop.
- Don’t crowd the pan. Give space! Overlapping = steaming, not crisping.
- Finish with a pinch of flaky sea salt right out of the oven — it enhances the umami and adds a delightful texture contrast.
7. Variations & Substitutions
Make this recipe work for *your* life:
- Gluten-free: Swap panko for gluten-free panko or crushed gluten-free cornflake crumbs (they hold up beautifully).
- Lower-carb: Use crushed pork rinds or almond flour + Parmesan (1:1 ratio).
- Spicy version: Add 1 tsp cayenne + 2 tsp chili powder to the crust. Serve with spicy honey or sriracha mayo.
- Herb-forward: Stir 1 tbsp fresh chopped dill + 1 tsp dried rosemary into the crumbs.
- Breader-free: For an even crispier texture (like wings), add ¼ cup cornstarch to the crumb mixture.
8. Storage & Reheating
Fridge: Store cooled tenders in an airtight container up to 4 days.
Freezer: Freeze unbreaded chicken strips on a tray (flash-freeze), then transfer to a zip-top bag. Or freeze fully cooked tenders up to 3 months.
Reheating: For maximum crispness, use your air fryer at 375°F for 4–6 minutes. Oven: 400°F on a wire-rack sheet pan for 10–12 minutes. Avoid the microwave if you want that signature crunch!
9. FAQ
Q: Can I use chicken breast instead of tenders?
A: Absolutely! Cut boneless, skinless breasts into tenders or strips. Keep an eye on cook time — smaller pieces may be done in 2–3 minutes less.
Q: Why did my coating fall off?
A> Likely due to one of these: 1) Chicken wasn’t patted dry before buttermilk soak, 2) Not pressed firmly into the crumbs, or 3) Cooked too soon after breading (let it rest!).
Q: Are these really like Chick-fil-A?
A> Close! This version skips the pressure fryer, uses oven or air fryer, and tweaks the seasoning with smoky paprika and a hint of garlic — but the buttermilk-bread-crumb method delivers that same signature crunch and tenderness.
10. Conclusion
There you have it: homestyle crispy chicken tenders that strike the perfect balance between comforting and contemporary. They’re easy enough for weeknights, impressive enough for guests, and endlessly adaptable — whether you’re sticking to tradition or shaking things up with gluten-free or spicy twists.
Pair them with a crisp slaw, baked sweet potato fries, or your favorite homestyle dipping sauces (try ours from the sweet and spicy honey pepper chicken recipe!). And when you pull those first golden-brown, sizzle-sounding tenders from the air fryer? That’s when you know — dinner just got a whole lot better.
Print
Homestyle Crispy Chicken Tenders
Crispy, tender, and juicy homemade chicken tenders with a seasoned panko coating, baked to golden perfection. Ready in under 30 minutes and endlessly adaptable — perfect for meal prep, kids, or satisfying fast-food cravings.
- Total Time: 25 minutes
- Yield: 4 servings
Ingredients
- 1 lb boneless, skinless chicken breasts, cut into 1-inch strips
- 1 cup panko breadcrumbs
- 1/4 cup all-purpose flour
- 1 tsp paprika
- 1 tsp garlic powder
- 1 tsp onion powder
- 1/2 tsp salt
- 1/2 tsp black pepper
- 1/2 tsp mustard powder (optional, for depth)
- 2 large eggs, beaten
- 2 tbsp mayonnaise
- 1 tbsp olive oil or melted butter
- Pinch of cayenne (optional)
Instructions
- Preheat oven to 425°F (220°C). Line a baking sheet with parchment paper.
- In a shallow bowl, mix panko, flour, paprika, garlic powder, onion powder, salt, pepper, mustard powder, and cayenne.
- In another bowl, whisk together beaten eggs, mayonnaise, and olive oil.
- Dip each chicken strip into egg mixture, letting excess drip off, then press into panko mixture, coating both sides firmly.
- Place coated tenders on the baking sheet, spacing them slightly apart.
- Bake for 12–15 minutes, flipping halfway through, until golden brown and internal temperature reaches 165°F (74°C).
- Let rest 3–5 minutes before serving. Serve warm with dip of choice.
Notes
- For extra crispiness, broil 1–2 minutes at the end — watch closely.
- Baking time may vary depending on chicken strip thickness — use a meat thermometer.
- To make quicker: use pre-cut chicken tenders or air fry at 400°F for 10–12 minutes, flipping halfway.
- Prep Time: 10 minutes
- Cook Time: 15 minutes
- Method: Baking
- Cuisine: American
- Diet: High Protein
Nutrition
- Serving Size: 3 tenders
- Calories: 280 kcal Kcal
- Sugar: 1 g
- Sodium: 420 mg
- Fat: 12 g
- Saturated Fat: 3 g
- Unsaturated Fat: 7 g
- Trans Fat: 0 g
- Carbohydrates: 23 g
- Fiber: 1 g
- Protein: 25 g
- Cholesterol: 95 mg